Posted on Leave a comment

Turning Green Wood (Part 1)

Turning Green Wood – an introduction

So, you’ve been turning seasoned blanks sourced from various suppliers, but you fancy something a bit more challenging. How about turning green wood, that is wood that has recently been felled and hasn’t been air or kiln dried? This opens up the opportunity to turn local wood species, unusual pieces like burrs/burls, and probably save money too! If you hear a chainsaw locally, go and ask the owner if you can have a look. It could be a homeowner who may be happy to donate some wood to you or it could be an arborist who is chipping everything anyway. They’re usually open to some bartering or even a freebie! Less for them to cart away.

Getting Started

I won’t be covering all the weird and wonderful techniques turners around the world have dreamed up to turn a lump of wood into something they can produce a blank. Let’s just consider the basics of the initial turning. At all stages dealing with green wood, think safety. I do not wish to be alarmist, just sensible. The fresh cut wood may have stresses and strains in it from felling, unseen cracks, loose bark and even excessive sap, all of which can produce flying missiles and hurt you. Protective outerwear and a stout face-mask are initial essentials (PPE).

The best starter technique is to turn your piece between centres driven by a spur drive and supported by a live centre. It is important you have good visible centre mounting points as we’ll be using these in part 2 for remounting the piece once initial drying has completed. The piece should have first been made roughly round by chainsaw or band-saw before mounting, again taking care and using PPE.

Initial turning should be at low speeds whilst knocking the edges off, just fast enough to have acceptable vibration in the lathe. This can be increased as the piece becomes more stable. Once round a chucking tenon should be formed at the headstock end. If you’re working on a large enough blank, turn a 4″ (100mm) approx tenon at this stage. We’ll use this tenon for rough shaping of the vessel and hollowing. Later, after drying the tenon may distort or even become oval. As we have made this tenon larger and retained the centre mounting point, the blank can be remounted between centres using a ball or large cone centre at the tail-stock end, and the tenon reduced to around 2″ (50mm) for the next size down set of chuck jaws.

Rough Turning

The piece should be mounted in the chuck jaws and supported by the tail-stock. With a bowl gouge (1/2″ ideally so it has some meat!) rough turn the exterior to an approximate shape for the final piece. This will be refined when dry. Depending on the wood species you may well have streamers of wet peeling come off the piece as you turn it or even sap as liquid spraying you! When this step is complete, you now need to hollow the vessel aiming to leave it with around 1″ walls. Again this allows us room to refine the shape when dry and remove any distortions to bring it back into the round.

Hollowing

There are many ways to hollow, but my preferred method is to drill a depth hole in the centre of the vessel to the required depth. This both gives us a starting point for the hollowing cuts but also gives you a depth marker so you know when you have bottomed out the vessel to the required depth. I prefer to use a Forstner bit of around 40mm often with an extension bar to reach the required depth. Some of the systems you might consider to aid hollowing are:

  • Hope Easy Arm Hollowing Jig – link
  • Hope 6 mm Mini Carbide Box Set – link
  • Robert Sorby Hollowing Tools – link
  • Crown Revolution Hollowing tool – link
  • Woodcut Hollowing Tools – link

These systems all make the process easier. Make no mistake, hollowing is a more advanced technique and not only because you can’t see the cutter while cutting! If you can, try before you buy. No option is cheap, and you will find what suits one turner, doesn’t another. Some of the systems provide extra aids like laser or camera systems to aid you knowing where the cutter is internally and allow you to manage wall thickness without recourse to constant caliper checks. Most of the systems offer a variety of cutters, some designed for the swift removal of wood, others of a scraper nature to enable smoothing of the interior wall. Constant removal of the chips and streamers from the hollow with an improvised rake or an airline to prevent clogging.
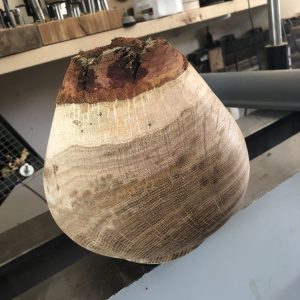
Rough Turned Oak Vessel

Packing the piece for drying

When the rough turning is complete, place the vessel in a box or paper bag and surround and pack loosely with the wet shavings. Seal it and weigh it, recording the weight on the exterior. Put in a cool dry place and forget about it for a few months. You want it to dry slowly to minimize cracks and distortions. An inch thick vessel could take up to a year to dry, so patience is needed. Weigh the carton/bag periodically recording the value on the container. When the value stops reducing, you have reached an equilibrium point. Time for the final stage of turning and the creation of your finished piece!

Cleaning Up

After a session of green wood turning it is essential you clean off the lather bed and your tools. The sap can be sticky, acidic or just wet! None of which is good for steel and cast iron. After cleaning off, treat your tools to a protective coating of wax, mineral oil or commercial protective spray e.g. WD40, Axcaliber Dry Lubricant.

Look out for Part 2 when we complete the turned vessel.
Posted on Leave a comment

The Science Behind the Art…

Introduction – the basic science of cutting wood!

In this article, I’ll cover some of the science fundamentals of turning wood because this affects the why and how of the interaction with the timber we turn, whether cutting, sanding or applying stains and finishes.

Timber – the biology

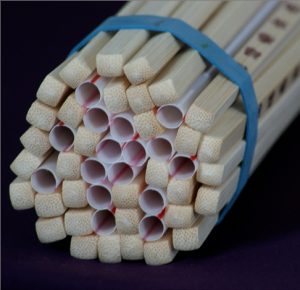
Any piece of wood is made up of fibres, which are actually minute tubes usually arranged in a bundle, running lengthwise up and down trunks and branches. Let’s illustrate that with a bundle of straws and chopsticks!

Vascular bundle of a branch illustrated by a bundle of chopsticks and straws

I am not going to discuss the biology in this article ( that can be found here), more the effects we need to be aware of, so we can use them to our advantage, or avoid them causing issues as we create our masterpiece! For now, think of the chopsticks as structural strands in the bundle, and the straws as tubes, that move nutrients through the wood. The important point is the bundle strands are all orientated in one direction. The exception to this arrangement is burr or burl wood where the fibres are random and have no uniform direction. This both gives this type of timber its beauty but also makes it harder to turn.

Spindle Turning

In spindle turning the piece of wood has its fibres aligned with the lathe bed and is usually turned between centres. Traditionally a 2 or 4 prong drive centre is used at the head-stock and a cone centre in the tail-stock. The tool approaches the spindle and is run along its length on the tool-rest effectively planing shavings off the spindle as the tool traverses the spindle. The tools can be spindle gouges or a skew chisel. The skew, in skilled hands, can produce a near perfect finish off the tool, including beads and coves.

These days, many turners prefer alternative centres which don’t penetrate the straw bundle of fibres, as they are designed to spread the load across more fibres ends. These centres include the ring centre and the steb centre.

Bowl Turning

In bowl turning the piece of wood is effectively held at right angles to the lathe bed, meaning the fibres rotate in opposition to the lathe bed. The means for two quarter turns the fibres are aligned with the tool cutting edge and “plane”, and two quarters the end grain is offered so the cut is across the bundle of tubes. For this reason, there can be greater forces involved. so the wood is held firmly to a face-plate or in a chuck. The bowl gouge is also more substantial in construction and generally longer so the turner has more leverage to control the tool.

Rubbing the bevel

The phrase “Rubbing the bevel” is common parlance with woodturners for good reason. The concept is the smoothly polished steel shoulder behind the cutting edge rubs against the timber and doesn’t cut until the handle is lifted very slightly until the front edge starts to cut. The same is true of gouges and skews, but the technique is different.

Sanding

Sanding usually involves working through the grit range, typically 80 > 120 > 180 > 240 > 320 > 400 and sometimes on to 600 > 800. Again remember the fibre tube orientation, the advice in traditional woodworking is to sand with the grain, that is, along with the tubes. That is harder in wood-turning. With spindles, some sanding with the grain can help remove marks or raised grain. With bowls, you have end and cross grain presented to the grit alternately as the bowl turns. The raised grain is usually the end grain showing itself as you sand. Some lathe’s offer a reversing facility, thus allowing you to sand the tubes from two directions which can aid getting a smoother finish, by severing the raised fibre ends.

As you get to the end of your sanding regime, a sanding sealer is often applied which can be shellac based and may also contain solids (often talc!). The idea is to bind surface fibres and fill minute holes, that is, the tube ends of the vascular bundle from the end grain.

Staining and Colouring

With staining and colouring regardless of whether spirit (Chestnut) or water-based (Intrinsic Colours) products are being used, the tubes come in to play again. In this case, they can act like straws, the colour being drawn up the tube which can give the effect of deeper shades on end grain than on the side. Most turners tend to colour, then seal, as colouring can again raise the end grain and require cutting back with a non-aggressive product like NyWeb pads. With thin walled vessels or woods with a coarse grain, be aware that colour can bleed through the vessel wall! In some situations this is not what you want, however, some turners work with burr/burl, colour from the inside of the vessel so the random nature of the grain orientation causes variable bleed through the wall sometimes resulting in attractive patterns being formed on the visible outside of the vessel.

Finishing

Lastly the finish! I’ll address finishes in another article in more depth, but for now, getting the preparation right up to this point, pays huge dividends in the final finish, whether oil, lacquer or wax. Having a smooth, even, dust free, sealed surface forms the perfect foundation for your final layer of finish, which will really make your piece pop! Don’t rush these final stages, expect to take as long finishing as using the turning tools!

Conclusion

Understanding the structure of the timber affects every process you undertake in creating your end product, whether mounting, cutting or finishing. Grasping these fundamentals will help you understand why we undertake these processes in a particular way, and how you can adapt them to accommodate your own creative ideas successfully.

Posted on Leave a comment

Mounting the Blank – Starting Your Bowl

Introduction – Starting your first bowl…

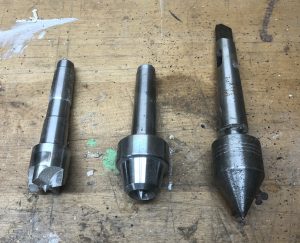
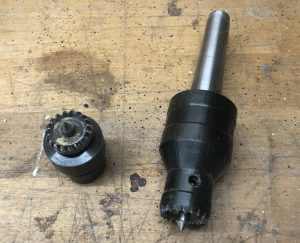
Mounting your bowl blank is the first step to getting started. Whether it is square or round, you need to find the centre. There are many tools available to help you be more accurate than just eyeing it up! These include:

The centre is generally first found and marked out on the top of the bowl, which will ultimately be the part hollowed out.

Marking Out the Blank

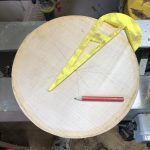
With a square blank, drawing pencil lines across opposite corners, the intersection marking the centre, is the easiest option. If you’re making a square bowl you’re done, if you’re making a round bowl, remove the blanks corners by bandsaw or hand. If you are finding the centre of a roughly circular blank, centre finders work by enabling you to draw multiple lines from the edges to intersect in the centre. This helps you pinpoint the best centre point. The centre point should be marked with a bradawl or centre punch to form a depression the drill can be started in. Lastly, we have the perspex circle layout template. This is particularly useful when working with uneven natural edge blanks, enabling you to find the optimum centre visually, as the actual centre may not be the best aesthetically for your envisaged design.

Drilling the Pilot Hole

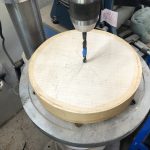
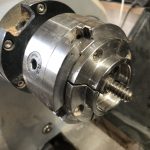
The drill size needs to be equivalent to the core diameter of your worm-screw excluding the thread depth, typically around 8mm. You must only drill the hole deep enough to allow the worm-screw to bite and the blank threaded home to sit snuggly and evenly against all the chuck jaws. Many turners keep a drill just for this process and wrap a piece of electrical tape around the drill to mark the maximum depth. If you have a smaller, shallower blank, you don’t have to use the whole depth of the worm-screw. A spacer can be added made of ply or plastic which sits bewteen the chuck jaws and the blank allowing only three or four threads to penetrate the blank. This perfectly secure for smaller blanks.

The hole needs to be drilled as perpendicular to the blank as possible. I prefer a drill press, but some turners use a battery drill being careful to hold it vertical. The blank can now be threaded onto the worm-screw. The blank should be offered up and screwed on carefully, applying even pressure. The aim is to get the blank screwed fully home touching all the jaws, but not over tightened to the point of possibly stripping the thread in the blank! Spin the blank by hand to check it is running fairly true, don’t worry about slight wobbles, no blank is completely true.

Conclusion

Next, we will look at roughing out the back of your bowl and getting it true.

Posted on Leave a comment

Holding your work in a chuck! Are You an Innie or an Outie?

Introduction – Getting a Grip!

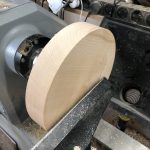
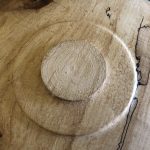
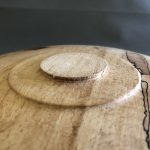
This article is a consideration of how best to hold your bowl blank in your chuck. You will find different wood turners all have different views on this topic. Personally, I think there is a place for both techniques. The inner technique requires a slight recess in the base of your bowl blank, perhaps 3mm deep, of a diameter slightly more than your chucks jaws when nearly closed, with a dovetail edge to the rim of the recess. The outer method is the reverse, a spigot is formed perhaps protruding 3mm, also with a dovetail edge, and of a diameter to fit inside the jaws when nearly closed and forming a near perfect circle. Each method has advantages and disadvantages, part of your evolving skill is picking the best method for your turning plan.

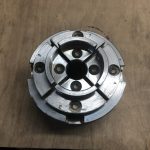
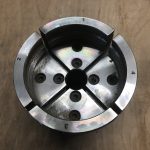
The Jaws

So. let’s unpick the stages to this decision to help inform your choice. I have three sizes of these jaws often referred to as Type C. They have a slightly dovetailed cross section on both the inner and outer rims. The standard size is 50mm often supplied as standard jaws with a new chuck. I also have 35mm ones which I use for smaller boxes and on rare occasions, I have to reform a spigot on a piece where the 50mm dovetail has become malformed. The 100mm can be used for larger work, but I use them primarily for the initial rough turning of green wood vase/urn blanks. As the blank dries, the spigot can distort, perhaps becoming more oval, so the blank has to be re-chucked between centres so the distorted 100mm spigot can be remodeled as 50mm, so I can re-hold the piece in the standard jaws. Woodturning is often about planning a job ahead of time and allowing for “design opportunities” as wood turners euphemistically refer to things not going as originally planned!

The Chuck

There is a range of chucks on the market that comes with what is often referred to as Type C jaws as standard at the time of writing, including the Nova G3 or SupaNova, Robert Sorby Patriot and Record SC4. I have a Patriot and an SC4. There is very little to choose between them.

The chuck jaws are manufactured as a disc, then sliced into accurate quarters normally using a 2mm slitting saw. This means a perfect circle is formed by the jaws when there is a 2mm gap between the quadrants. The woodturners aim, when creating a spigot, is to make it as near to the jaws perfect circle dimension as possible, which in turn means as much of the jaw rim is in physical contact with the spigot as possible. This ensures the strongest grip on the spigot, supports the spigot and gives an even grip around the spigot. The reverse is true for a recess. When the jaws are expanded into the dovetailed recess they should also form a near perfect circle.

The Dovetail

The base of the bowl should firstly be trimmed to a flat even surface. Then, the dovetail should be carefully cut to the correct depth, often with a part-tool, then trimmed up to a dovetail section to match the dovetail angle, on your chuck jaws. Many people prefer to use a small skew chisel as a scraper for this finishing cut. It is important that the angle of the dovetail does match your jaws, again to make sure there is good even contact between the jaws and timber. You should also check that the root of the dovetail is clean and not full of dust, so the jaws sit correctly. The recess for an expansion grip should be cut similarly. Firstly, a groove is cut to allow the jaws to enter and sit snuggly against the base of the bowl. Turners often remove all the wood from the recess at this stage. Again, the correct dovetail is formed on the outer edge of the recess, allowing the jaws to expand snuggly into place.

The Grip

Following the steps previously described above should give you a strong dovetail for the jaws to grip. Most woodturners feel the compression effect of gripping the spigot is the strongest method, although if you experience a major catch, your work can either be ripped from the jaws or the spigot can become severed! The expansion method in a recess is strong while the bowl blank is unrefined, but as soon as you start forming the foot of a bowl, the ring of timber then formed has the potential to split with the wedge-like chisel pressure the jaws are applying. The turner just needs to be aware of the issues and adjust their cuts appropriately. One other factor to bear in mind is the wood density, which can affect how much the wood can be compressed under the mechanical pressure of the steel jaws. Soft timbers like Lime can be deformed very easily, whereas Oak less so. Consideration should also be given to timbers that split with the grain easily, like Ash. This timber is often used for shingles and similar purposes because it can be readily split, but this can work against us in an expansion chuck grip scenario. Do not let this put you off, just balance the factors in your planning after all Ash is a fabulous timber offering many possibilities in creative turning.

Finishing Up

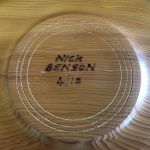
Your piece is now finished, what’s next? If you used a recess, there’s nothing more to do. If you used a spigot, you now need to remove it. In-depth information can be found in my article Bowl Bottoms! For now, the stub can be removed by reverse chucking the bowl using a friction faceplate supported by the tailstock, cole jaws, Longworth or vacuum chuck. The stub is gently turned away with light cuts, leaving a slightly concave base. Your maker’s mark and any decoration should be applied before final finishing to match the rest of the piece.

Conclusion

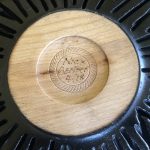
So, Innie or Outie? The recess method is quicker and leaves a re-chucking point in the base of the bowl. Some decoration in the recess can re-enforce the idea this is a feature of the bowl, leaving a rim like on a ceramic plate. Apart from aesthetics, the major downside is the strength when the recess is part of the foot.

The stub method requires more work at the end of the job to remove it and means it is very difficult to re-chuck should that be needed. For purists, exhibitions, and competitions, no visible chucking point and a properly finished smooth bottom are essential features. In the end, it is your choice.